Harami Candlestick Pattern: A Complete Guide to Bullish and Bearish Signals
Introduction
Candlestick charts are the language of price action. Each candle tells a story about the battle between buyers and sellers, and when two candles combine, they often reveal powerful insights into market psychology. Among the most significant two-candle formations is the Harami pattern, a setup that signals potential reversals in both bullish and bearish contexts.
The word Harami comes from Japanese, meaning “pregnant.” The name reflects the visual appearance of the pattern: a large candle followed by a smaller one nestled inside its body. This formation suggests hesitation in the prevailing trend and often precedes a change in direction. Traders across stocks, forex, and crypto markets use Harami patterns to anticipate shifts and design entry or exit strategies.
In this article, we’ll explore the bullish Harami and bearish Harami in detail, understand their psychology, learn how to trade them effectively, and see how they compare with other candlestick setups.
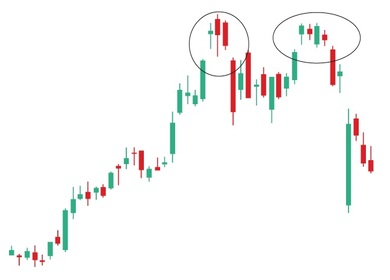
1. Anatomy of the Harami Pattern
The Harami is a two-session pattern:
- Day 1 (P1): A long candle that reflects strong momentum in the prevailing trend.
- Day 2 (P2): A smaller candle whose body is contained within the body of P1.
The colors of the candles matter:
- In a bullish Harami, P1 is bearish (red/black), and P2 is bullish (green/white).
- In a bearish Harami, P1 is bullish, and P2 is bearish.
The smaller candle represents uncertainty. It shows that the dominant side (bulls or bears) is losing strength, and the opposite side is beginning to challenge control.
2. The Bullish Harami
Formation
- Appears at the bottom of a downtrend.
- P1 is a large bearish candle, confirming sellers’ dominance.
- P2 is a small bullish candle, opening higher than P1’s close and closing within P1’s body.
Market Psychology
The first candle reflects fear and selling pressure. On the second day, instead of continuing downward, the market opens higher, surprising bears. Buyers step in, forming a small bullish candle. This sudden shift creates doubt among sellers and encourages buyers to accumulate positions.
Trading Strategy
- Entry: Aggressive traders enter at the close of P2. Conservative traders wait for confirmation on P3.
- Stop Loss: Placed at the lowest low between P1 and P2.
- Target: Resistance levels or Fibonacci retracement zones.
Example
Imagine a stock trending downward. On Monday, it prints a long red candle. On Tuesday, it opens higher and closes with a small green candle inside Monday’s body. This is a bullish Harami, suggesting a possible reversal.
3. The Bearish Harami
Formation
- Appears at the top of an uptrend.
- P1 is a large bullish candle, showing strong buying.
- P2 is a small bearish candle, opening lower than P1’s close and closing within P1’s body.
Market Psychology
The first candle reflects optimism and buying enthusiasm. On the second day, the market opens lower, unsettling bulls. Sellers gain ground, forming a small bearish candle. This hesitation signals that the rally may be losing steam.
Trading Strategy
- Entry: Aggressive traders short at the close of P2. Risk-averse traders wait for confirmation on P3.
- Stop Loss: Placed at the highest high between P1 and P2.
- Target: Support levels or moving averages.
Example
Consider a stock in a strong uptrend. On Thursday, it prints a long green candle. On Friday, it opens lower and closes with a small red candle inside Thursday’s body. This is a bearish Harami, hinting at a potential reversal.
4. Key Conditions for Valid Harami Patterns
- The second candle must be smaller and contained within the first.
- The prior trend must be clear (downtrend for bullish Harami, uptrend for bearish Harami).
- Shadows (wicks) are less important; focus on the real bodies.
- Volume spikes during P2 add credibility to the reversal signal.
5. Comparing Harami with Other Patterns
- Engulfing Pattern: Stronger than Harami because the second candle completely covers the first.
- Piercing / Dark Cloud Cover: Similar to Harami but requires partial coverage of the prior candle.
- Doji: Represents indecision; when combined with Harami, it strengthens the reversal signal.
6. Risk Management
Candlestick patterns are probabilities, not certainties. False signals occur frequently. To manage risk:
- Always use stop losses.
- Avoid trading Harami patterns in sideways markets.
- Combine Harami with indicators like RSI, MACD, or moving averages for confirmation.
7. Timeframes and Applications
- Daily charts: Best for swing traders.
- Intraday charts (5–15 min): Useful for scalpers and day traders.
- Weekly charts: Provide long-term signals for investors.
8. Common Mistakes to Avoid
- Misidentifying patterns when bodies don’t align properly.
- Ignoring prior trend direction.
- Trading without confirmation from other indicators.
9. Advanced Tips
- Backtest Harami setups on historical charts.
- Use Harami patterns with support/resistance zones for higher accuracy.
- Watch for Harami near psychological price levels (round numbers).
Conclusion
The Harami candlestick pattern is a subtle yet powerful signal of potential market reversals. Whether bullish or bearish, it reflects hesitation in the prevailing trend and offers traders opportunities to anticipate shifts. By combining Harami with risk management, supporting indicators, and proper context, traders can significantly improve their decision-making.
Remember, no pattern guarantees success. The Harami simply tilts probabilities in your favor. With practice, patience, and discipline, it can become a cornerstone of your trading strategy.